Sunday, December 11, 2011

Cross Resource Pool VM Copy

xe host-call-plugin host-uuid= plugin=copy fn=get_vm args:remote_vm_uuid= args:local_sr_uuid= args:remote_host= args:remote_username=root args:remote_password=

parameters explained:

xe host-call-plugin - is the xe command to execute plugins
host-uuid= - is the UUID of the XenServer you want to import the VM to (the host on which the plugin is executed)
plugin=copy - is the /etc/xapi.d/plugins/ to use ... in this case: copy
fn=get_vm - the function of the plugin to call (each plugin can serve multiple purposes - the copy plugin for example has about 5 or so different purposes) … in this case: get_vm
args:remote_vm_uuid= - the UUID of the VM to copy/import
args:local_sr_uuid= - UUID of the SR the VM should be imported to
args:remote_host= - IP of the XenServer the VM is installed on
args:remote_username=root - you can figure that one out yourself ?
args:remote_password= - well, a password will be needed since the XenServer doesn’t know anything about the other resource pool

e.g.

XenServer-1 IP = 1.2.3.1
XenServer-1 Username / Password = root / password
XenServer-2 UUID = 8ad2e8cb-7447-463e-bf92-8301e0ba4562
Debian VM @ XenServer-1 - UUID = 33f82e4f-cc26-f0b9-7943-5239945aef61
Local SR @ XenServer-2 - UUID = 0d417f8a-c527-4b00-08ce-21a63a7238b6

The following command was executed from XenServer-2:
xe host-call-plugin host-uuid=8ad2e8cb-7447-463e-bf92-8301e0ba4562 plugin=copy fn=get_vm args:remote_vm_uuid=33f82e4f-cc26-f0b9-7943-5239945aef61 args:local_sr_uuid=0d417f8a-c527-4b00-08ce-21a63a7238b6 args:remote_host=1.2.3.1 args:remote_username=root args:remote_password=password

Once it's completed, you will see a Debian VM appear on XenServer-2.


The above should allow you to easily migrate/backup/copy VMs between completely separated resource pools (completely separated is not entirely true since both environments will obviously have to have network connectivity ?) without the need for manual export/import operations or complex LUN re-assignment steps.

Thanks to Stefan from Citrix for this nice tip :)

Tuesday, April 12, 2011

XD5 - Change the site to use Active Directory based registration

1. Creation of a simple OU in the domain tree. It can be an empty OU container. This only need to be done one time.

2. Run the following Powershell command (change accordingly to suit your AD's OU). This command also need to be done one time.


Set-ADControllerDiscovery –existingOuDN “ou=xd5, ou=windows 2008, dn=company,dn=com” –on


Set-ADControllerDiscovery -sync

The OU DN is derived using MS standards for converting Canonical names shown in ADMMC console to Distinguished Names as required by the command.

Subsequent DDC's added to the site will need to run the same command with the -sync options as shown in the second command.

3.  Delete the "ListOfDDCs" key and add the "FarmGUID" key of type "REG_SZ" to the following location on the VDA's registry.

HKLM\SOFTWARE\Citrix\Citrix Virtual Desktop Agent\

As a value for the new FarmGUID key, use the Farm GUID shown in the Desktop Studio console (will appear after the Powershell command is run) and that should get the desktops registering.

Thursday, April 7, 2011

Infographic of Android Ecosystem


Source: http://www.frandroid.com/66429/des-infographies-sur-le-fonctionnement-dandroid/

Thursday, March 17, 2011

XenServer 5.6 FP1 Realtek NIC Issue

If you are using Realtek NIC (RTL8111/8168B) and after upgraded from XS 5.6 to XS 5.6 FP1, you encountered the network is not working, try the following workaround.

$ echo "options r8169 use_dac=1" >> /etc/modprobe.conf

Restart and now the NIC should be functioning properly.

Credits: http://blog.root1024.ch/virtualisierung/citrix-xenserver/nach-update-auf-xenserver-5-6-1-fp1-kein-netzwerk-mehr/

Tuesday, March 15, 2011

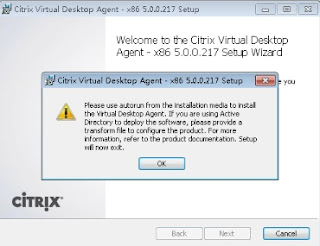
Virtual Desktop Agent Installation

If you are encountered the following error during the VDA installation,


kindly try to use msiexec with the following parameter.

msiexec.exe /i XdsAgent_x86.msi INSTALLONWDDM=1 CONTROLLER_NAMES=DDC-HOST ENABLE_HDX_PORTS=1

And if you want to have a log, just add
e.g. msiexec.exe /i XdsAgent_x86.msi INSTALLONWDDM=1 CONTROLLER_NAMES=DDC-HOST ENABLE_HDX_PORTS=1 /l*v C:\vda-install.log

This error normally happened if you have a Windows Display Driver Model (WDDM) installed on the VDA.

Saturday, March 12, 2011

XenServer - How to go to Safe Mode

- At the boot prompt, type menu.c32
- Choose safe from the TUI presented.

That's all.

Tuesday, January 25, 2011

Windows - Find a VSS Aware Applications

Find a VSS Aware Applications

C:\vssadmin list writers

XenServer - Resize LUNs for XenServer SRs

Resize LUNs for XenServer SRs

1. Extend the LUN from the SAN
2. # xe sr-list name-label=
Note down the UUID of the SR
3. # pvscan | grep
Note down the device name, e.g. /dev/sdx
4. # echo 1 > /sys/block/device/device/rescan
e.g. echo 1 > /sys/block/sdx/device/rescan
5. # pvresize
e.g. pvresize /dev/sdx
6. # xe sr-scan
7. Verify from XenCenter or using command line that the new size is displayed.
e.g. pvscan | grep

XenServer - Initiate Kernel Crash

Initiate Kernel Crash

# echo c > /proc/sysrq-trigger

XenServer - Crash Guest VM

Crash Guest VM

# list_domain
# /usr/lib/xen/bin/crash_guest domid

XenServer - Destroy Hung VM

Destroy Hung VM

# list_domain
# /opt/xensource/debug/xenops destroy_domain -domid